Blog
4 Fun Spring Activities For Your Toddler
Springtime might very well be the best time of the year. Budding blossoms and trees signify a fresh start and the ever-welcome end of winter. If you live in a climate that experiences true winter, you know how challenging it can be. Being stuck indoors for months on end makes it feel like you’re at the mercy of good ol’ Mother Nature. If you’re at home with a toddler, though, that’s a whole other can of worms.
People all around the globe go outside at the first sign of spring with open arms and a sigh of a collective sigh of welcome relief. The coming of spring means longer hours of daylight, warmer sunshine, colorful butterflies, spring blossoms and the freedom to go outside without being bundled up in ten layers of clothing. Thank goodness! Here are some great outside-the-box spring activities you can enjoy with your toddler without wearing ten layers of clothing.
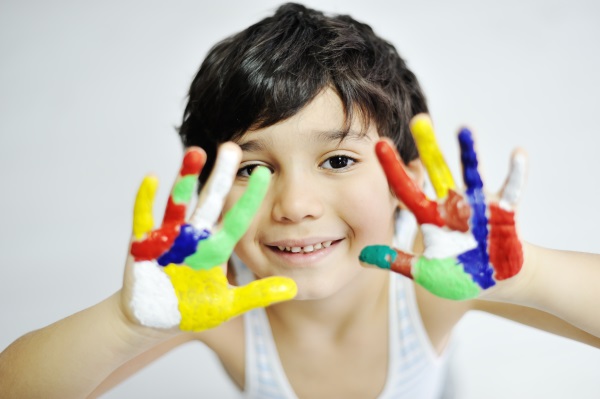
Because springtime means being free to go outside more often, we thought we’d start off our list with one of the messiest activities. This is one craft you’re going to want to go outside to do unless you’re not afraid of getting paint on your floors, walls, furniture or pets.
Items Needed:
- A Painting Canvas- Acrylic Paints
- Plastic Syringes
- Paintbrushes
- Paint Palette
Instructions:
1. We warned you that this could get messy so the first thing you should do is dress for the occasion. Put your toddler in some old clothes or something that you don't mind if it gets paint on it. Chances are the canvas wont be the only thing with paint on it. If you already have a painting smock that's even better.2. Place your canvas on the ground outside on your driveway or your lawn. If the idea of getting paint on the driveway or grass isn't for you could put down some plastic or a tarp under the canvas.
3. Let your toddler choose the paint colors he or she would like to use for this activity. If you don't have acrylic paint you can probably find it locally. It's usually available at dollar stores, craft stores or big-box retailers.
4. Let your child squeeze their favorite colors onto the paint palette. If you don't have a paint pallete you could just cut your own out of cardboard box or use a paper plate.
5. Fill the plastic syringes with the colors, one color per syringe. If you don't have syringes you could substitute plastic bags and then just cut off a tiny piece from one of the corners of the bag.
6. Let your child dip the paintbrush in a color from the palette. Help them flick the color onto the canvas. This will create splotches of paint all over the canvas. Try flicking fast. Try flicking slow. Try jumping up and down around the canvas with paint-filled brushes in your hands. Try to use different paintbrushes for different colors to avoid making unsavory colors on the canvas.
7. Once they’ve had enough fun flicking the brushes, grab those pre-filled paint syringes and shoot the paint all over the canvas. Get crazy with it!
8. When you're done painting leave your canvas on the ground until it's dry. Be sure to take plenty pictures of your artists work so you can share it with family and friends.
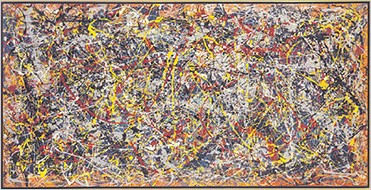
By the time you're done with your messy canvas painting you might have something that looks a little like the picture above. That's not a painting from a toddler though; it's from the world-renowned artist Jackson Pollock. That particular painting, "No. 5, 1948", was once sold for $140 million. I can't promise you that you'll be able to sell your toddler's painting for that kind of money but it might make you think twice before ever throwing it out.
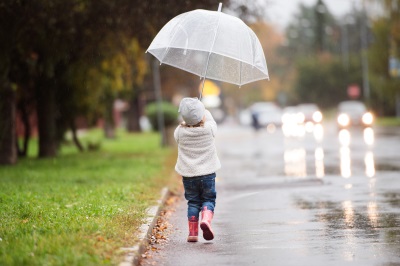
Sure, the days of snow and slush may be dwindling, but with spring comes to rain. After all, April showers bring May flowers, right? A great way to celebrate the melting of snow and the coming of rain is by making your own rain stick. Fortunately this rain stick wont make any thunder sounds to scare your toddler. Bonus, you probably have all of the items needed to make your rain stick in your house.
Items Needed:
- Cardboard Tube (aluminum foil rolls work best)- Aluminum Foil
- Glue
- Packaging Tape
- Tissue Paper
- Thumbtacks
- Filler (rice, buttons or beads)
Instructions:
1. Push your thumbtacks into the tube, from the outside towards the center. The more thumbtacks you use, the better.2. Use the packaging tape to seal off one end of the tube.
3. Pour your filler items into the tube. Your filler items should be small in size so they don’t get stuck between the thumbtacks you pushed into the side of your tube. You only need to fill the tube about quarter of the way.
4. Seal off the remaining open end of the tube like you did in step 2. This will ensure your filler stays in the tube and off of the floors.
5. Roll the tube in aluminum foil. Make sure the foil is tight. Tape any seams as needed to prevent the foil from unwrapping.
6. Decorate! This is where your glue will come in handy. Brush it along the length of your tube and stick tissue paper on top. You can even coat the top of the tissue with the glue to help make it stick better. Get creative here. If you don’t have glue or tissue paper, you can use stickers or paint to decorate. Let your toddler decide.
Once you’re rain stick has dried try tipping it side to side slowly to make the sound of gentle rainfall. If you tip it side to side even faster you'll find yourself in the middle of an intense springtime shower.

If you have an adventurous toddler who loves to go for walks and paint this might be an activity they’ll enjoy. There are rock painting groups all over the world where families (and seriously talented artists) will find rocks, paint them and then hide them in plain sight. Once they’re hidden, other families can find new rocks and either keep them or re-hide them for someone else to find. Rock hunting groups are popular on Facebook so try searching for your community to see if there is already an active rock painting group in your city. If you don't have any local groups you can just paint a rock for your own yard.
Items Needed:
- A Rock- Acrylic Paints
- Paintbrushes
- Paint Sealer
Instructions:
1. The idea is to take your little one for a walk somewhere that has a lot of rocks, parks and nearby trails are great rock sourcing locations. If you don't have any large rocks nearby you can always head to a home center or landscape center and buy a rock or paver stone.2. Once you have a few high-quality rocks that they’re excited about, you can head home and wash your rock outside to remove any dirt that might be present. Let your rock dry off before you move onto the next step.
3. Once your rock is dry put on your painting gear. You’ll paint the rocks together however you like. There are a lot of ideas online for how to paint rocks into pigs, butterflies or beautiful landscapes, but we think the best-painted rocks are the ones where you let your little one tap into their own creativity, even if that means it ends up being a rock smeared with brown paint.
4. Once the paint on your rocks has dried you can choose to seal them with a glossy sealant that will prevent the paint from chipping or washing away. Look for a sealer that's weather resistant and non-yellowing. You'll find some sealants that advertise being UV resistant, that's preferable. You can usually find sealers like this at your local home-center in the paint aisle. Just look in the section where the spray cans are. This step is probably something that parents should do alone. You don't want your toddler inadvertently breathing in any of the spray.
5. Once the sealer has dried the next step is to go back out for another walk and don’t forget to take those rocks with you. This time, instead of finding rocks, you’re going to be hiding them. Let your toddler choose some hiding spots for their newly-painted rocks. The idea is to hide them in a place that another family will find them. By joining those rock hunting Facebook groups, you can see where families have hidden their painted rocks and leave clues as to where you’re hiding yours. No Facebook group for your community yet? Create one yourself and start a trend! If you'r toddler has become attached to their newly painted rock you could just leave it outside in your front yard near a walkway or near the mailbox. The most important thing is that your toddler had fun and you created new memories.
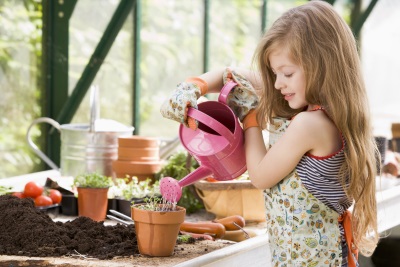
Though you may not equate gardening with toddlers, spring is the perfect time to encourage your little ones to become interested in flowers and gardening. While you might not see them outside in the garden with kneepads on talking about how the pH of the soil is just right it’s never too early to plant a seed (pun definitely intended) in the gardeners of the future. Take your toddler on a trip to your local home center or greenhouse supply center and look through all of the available flowers and plants. If you know something about gardening, this could be a great teaching moment for your child. Tell them what kinds of flowers you’re looking at and what color the blossoms will be when they bloom. If you're looking at vegetable seeds teach them what vegetable will grow from the plant. If your toddler wants the instant satisfaction of a grown plant go ahead and buy something that's ready for final planting and skip the seeds. You might also want to consider buying them gardening gloves and let them choose their own watering can to make it really exciting.
Items Needed:
- Vegetable/Flower Seeds/Plants- Gardening Gloves
- Gardening Shovel
- Pots
- Potting Soil
- Water Can
Instructions:
1. Suit up with your gardening gloves to keep those little hands clean.2. With your toddlers help fill up the pots with your potting soil. If the potting soil bag is heavy ask your toddler to hold the pots steady for you while you pour the potting soil. If you've got the room on your property you could skip the pots altogether and plant right into the ground. One advantage to the using pots though is you can put it in a spot that's out of reach of your toddler. That might increase the survival odds of your plant if your little one is still learning how to be gentle.
3. Using your shovel plant the seeds/plants per the instructions that came with them. Keep in mind that the planting instructions will vary depending on what you're planting. If you're using seeds and small pots you might want to put a couple seeds per pot. It's not unusual for there to be some seeds that won't sprout. If you put a couple seeds per pot chances are at least one plant will sprout up.
4. Locate your pots somewhere where they can get plenty of sun. The combination of warmth and moisture are important to get those seeds/plants growing fast.
5. Fill up your watering can and gently water your newly planted seeds/plants. Depending on your climate you may need to water once a day. If your toddler is going to do the watering it's probably a good idea to just put enough water in the can so that they can easily manage it.
6. Check back daily to see how your seeds/plants are progressing. If you planted different varieties of seeds there could be some variability in how long they take to germinate. If you planted different varieties of seeds some may sprout sooner.
Springtime toddler entertainment just got a whole lot easier with these fun craft and activity ideas. Make a little mess. Get a little dirty. Make those memories!
Never miss a new post. Subscribe via email today and receive site updates.
| Email |
By clicking Subscribe, you agree that you've read and accepted our Terms of Service and you consent to our Privacy Policy. |